
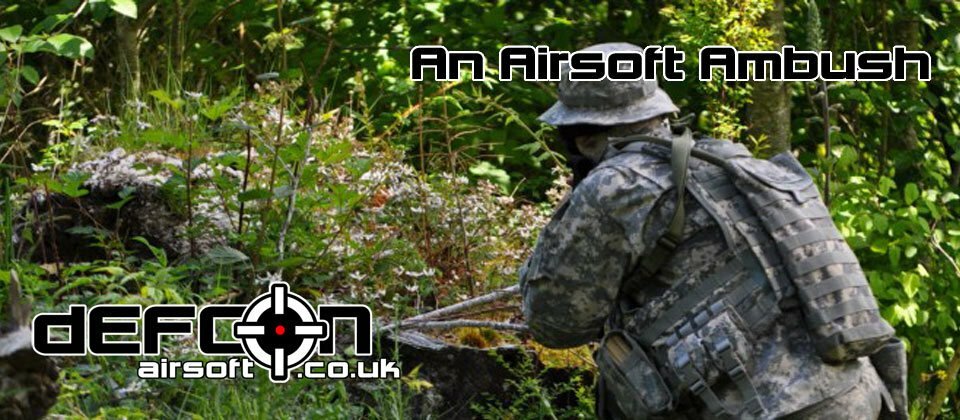
How to Mount an Airsoft Ambush
The article talks about about how to organise your Airsoft team for an ambush, scouting locations for a perfect ambush, and the different types of ambushes. It’s a great read, and will help your team get ready for your Airsoft skirmishes.
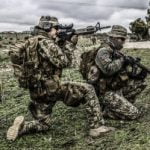
Chaos is the AirSofter’s worse enemy. Mounting an ambush is one of the most effective methods of creating this chaos. This article will provide you with the basic knowledge needed to spring a successful ambush, which can turn your best AirSoft opponent into easy prey.
Mounting the Ambush – The Ins and Outs Of Forest Ambushes
The ambush is one of the most effective forms of attack available to the infantry/small arms commander. It allows you to exploit
all the critical elements of assault, such as surprise, speed, and violence of action, to their full potential, while minimizing risks to your own forces.
A well-planned and executed ambush can seriously diminish your enemy’s capabilities. A single ambush can create an opportunity for victory, where it did not exist before. It’s a powerful tactic WHEN USED PROPERLY.
This article will provide you with the basic information needed to understand how an ambush works, and to execute one yourself.
TYPES OF AMBUSH
 There are two forms of ambush. One is called deliberate. The second is classified as hasty or immediate. Both are similar to one another, requiring the basic elements to succeed. Instead, one should view the terms as defining the conditions and circumstances the ambush is mounted in.
Deliberate Ambush is a planned attack against the enemy at a particular time and location. Preparing for deliberate ambushes is similar to any attack. You gather intelligence about enemy routes and targets of interest.
The team uses the information to develop a plan of attack. Once a plan exists, they rehearse every phase, from deployment to withdrawal. Important issues like routes of withdrawal, communications, fire controls and support are discussed and ironed-out.
When the ambush is launched, the teams careful planning allows them to maximize their capabilities and minimize confusion within friendly forces. Commanders seek to mount deliberate ambushes whenever possible
Hasty Ambushes are ambushes launched in response to a developing situation or unexpected opportunity. In Airsoft, opportunities for a hasty assault might occur when your opponent is withdrawing, or in pursuit of your team.
Another example is if your team is on patrol and locates the enemy without being spotted by the opponent. The commander might identify a good ambush location ahead of the enemy team, and move his force into position.
One should always use caution with hasty ambushes. The team leader must clearly identify the opportunity for assault and act upon it before it dissolves. The team should have a good understanding of ambush drills and need little guidance from their commander to set one up. One should avoid mounting hasty ambushes if their team have not trained in this form of attack often.
ROLES WITHIN THE AMBUSH TEAM
Every ambush team should be divided into three groups. The size of each group depends largely on the mission, enemy, terrain, troops available to you, and time (METT-T). No matter your strength, remember to divide your force properly.
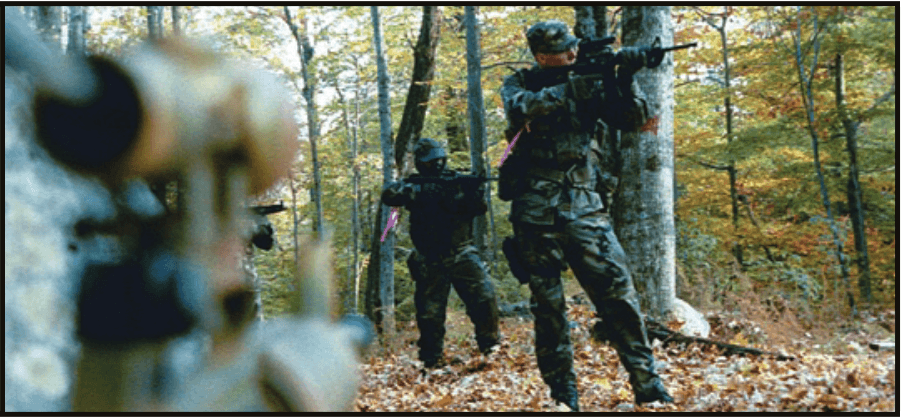
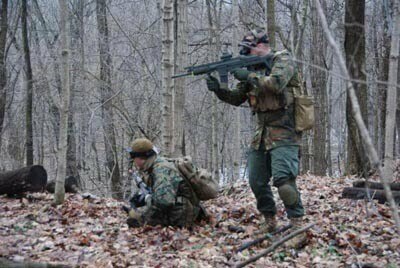
Blocking Groups: You will need two of these to be successful. Blocking groups are positioned on the extreme left and right fl anks of the ambush team position. Their job is to alert the rest of the team to the presence of the enemy. Once the attack begins, the blocking groups stop the enemy from retreating the way they came, or advancing in the direction they were heading. Furthermore, the groups prevent enemy reinforcements from rescuing the force being attacked.
Killing Group: As the name suggest, the killing group employs firepower, accuracy, violence of action, surprise, and speed to destroy the targeted enemy force. The group is usually positioned in-between the blocking groups. It’s a straightforward assignment. Operators just continue to accuracy shoot into the enemy trapped in ambush “kill zone” until no one is left alive. Once the shooting stops, the killing group might be tasked to check the dead for intelligence. If time is not on your side, the killing group should withdraw as soon as possible.
Security Group: This is an optional (though advised) group in your ambush force. Most counter-ambush drills call for a counterattack on the ambushing team’s position. The security group prevents the enemy from maneuvering on the friendly force’s location. Once the assault is complete, the security group will hold a defensive position providing rear security for the main force whom might be low on ammunition. However, it is an optional section of the ambush force.
You might not have the manpower to accommodate for a security group. In that case, my advice is to hit the enemy hard and run. There’s no need to hang around, particularly if the enemy is recovering. You might have to assign more than one task to the group, particularly if you are low on manpower. If this is the situation, remember to tighten up your line. That way the team can coordinate and mutually support each other.
GOOD AMBUSH LOCATIONS
 The enemy determines where the ambush will take place. You decide when and under what conditions the attack occurs in. Ambushes are more successful when they are mounted in areas where the enemy believes it dominates. Aside from relaxed security, a sudden attack behind enemy lines can degrade morale. It also might force the enemy to commit valuable assets to protect their rear positions, thus degrading their overall force capabilities.
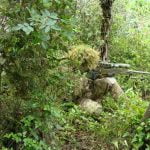
 Raids and ambushes by partisans in WWII forced the Germans to devote tens of thousands of soldiers to guarding supply and communication lines. This allowed the allies to achieve some of their greatest victories. Whatever the case, make certain it is a route that will be used by the enemy (e.g.: roads, routes of retreat and supply) When selecting an exact ambush spot, try to select an area that offers the ambush teams a good degree of cover and concealment, while maximizing visual range. Elevated terrain is good because it allows the ambushing team to fire down and forces the enemy to fire up. This can be difficult at close range and in a prone position (the most likely position the enemy will assume when attacked). Elevated positions are also more difficult to assault. Concealment is imperative.
Your team needs to be able to hide and wait for the enemy to walk into your kill zone. A great concealment spot is where vegetation changes like the end of forest and sides of roads. Make sure operatives are concealed, including their muzzle. That way, once the shooting starts, the enemy can’t locate your exact fire positions.
You want your team to have cover, yet the enemy to have none, or as little as possible. Since it’s unlikely to find such a location, make a compromise. The average human can sprint around 100yds in ten seconds. It could take you between 2-4 seconds to identify an enemy soldier on the run and accurately engage him. So you want at least twenty to forty yards of open space in every direction within the kill zone.
You should also consider the location of enemy reinforcements, and routes into and out of the ambush location. That way, you know where to and not to go. Another critical point I should make is to make certain the ambush location will cause the enemy to travel parallel to your line. Otherwise you will not be able to fire on the enemy in-depth. This will leave some hostile forces to counterattack.
LINEAR AND “L” SHAPED AMBUSH FORMATIONS
Two of the most common ambush positions are the Linear and what I call the “L” Shaped Ambush formation.
Linear Formation
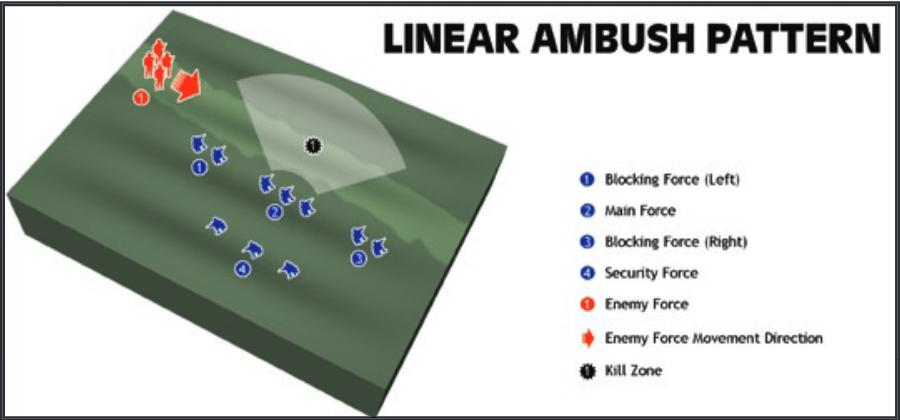
This has the ambush team deploying in a straight line along an enemy route of approach. Blocking groups are positioned along the extreme left and right flanks, with the killing group in the center. If you have a security group, they are usually deployed in depth behind the main line in reaction positions.
“L” Shaped Formation
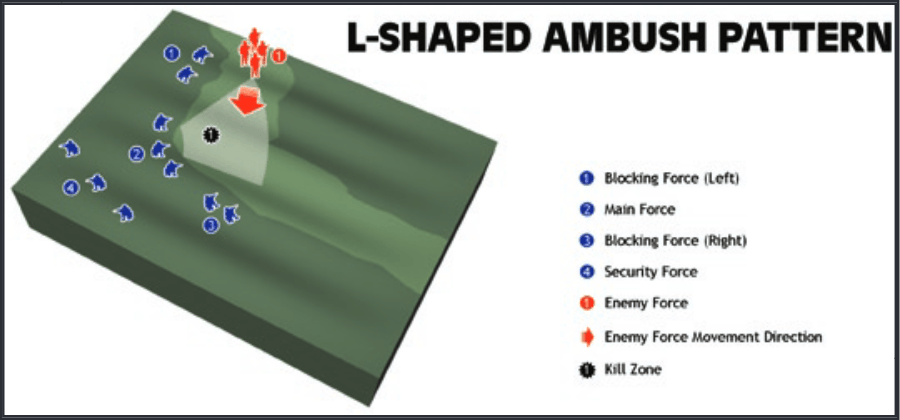
As the name suggests, the team is positioned in a “L” shaped formation. Blocking groups are deployed on the top left flank and lower right flanks (or vice versa). The killing group is positioned near or where the two lines join. The security group might be placed behind the killing group since or in the center behind the formation. Whatever their position make sure they can support all teams throughout the attack.
Hasty Ambushes
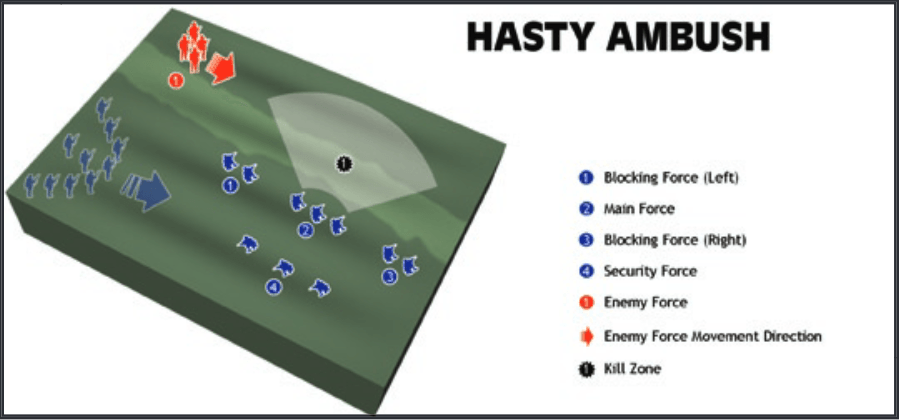
This is a rather dangerous form of ambush. In the example below, I will assume your Airsoft team is on a patrol and detects the enemy without being detected. Again, I should stress the importance of practice. The commander can not offer a lot of guidance to his personnel. Silence is important. All movements are choreographed based on training drills. The commander relies on the intelligence and skill of his team here more than any other form of ambush.
The hasty ambush begins with the detection of your opponent. The team leader calls a halt to determine if there is a nearby position to suitable for mounting an ambush. Cover and concealment are the most important factors, besides making sure the enemy will travel within range of the ambush position.
Upon determining the location, the team leader signals the team as to the position for the ambush, extent of kill zone, and security zone. Hand signals should be used to communicate with the team. One must always try to preserve the element of surprise.
The team deploys in position using cover and concealment to preserve surprise. In any hasty attack, the commander should make sure not to expand his line of assault. Each person should be no more than 10m/32.8ft from one another. Unlike in a deliberate assault, you do not have a lot of time to plan, work out fire zones, and other methods of coordination. Therefore, you maintain a tight formation to ensure unit cohesion throughout the battle. When the enemy enters the kill-zone, the commander signals for the assault to begin per Standard Operating Procedure. Everyone continues to shoot until the enemy is dead. (Refer to Final notes for more discussions on fire control and communications.) Then the assault force withdraws.
It’s important for the commander to determine what course of action is to be taken if the team is detected prior to assuming ambush positions. Movement increases the odds of detection. So plan for this critical possibility.
FINAL NOTES
Fire Control
 Controlling your team’s zones of fire is very important. The two formations discussed above go along way in assisting this effort. Never deploy personnel on both sides of an ambush formation. Ambushes are extremely combat intensive.
It might be very difficult for operatives to maintain Situational Awareness and not kill friendly forces. So keep them on one side firing in a single direction.
Communications
 Communications is also very important. The Blocking groups must covertly signal the rest of the team to the approaching enemy. And the commander must signal the team to start the attack. Hand signals might be good to signal the team about the enemy. However, it can also compromise your position. Low voice signals carry the same risk. You will have to determine what is best. You might need to pull your team further away and use brief signals.
The commander usually signals the team to start shooting by firing a burst of rounds at the enemy or detonating an explosive charge. So that should not be too difficult. You can use the enemy status and whatever signal you find appropriate to alert the team to cease-fire and withdraw. Ambush teams usually fire constantly, then cease-fire. Operatives then look for any movement from the enemy. If movement is spotted, a quick burst takes out the bad guy. Once everyone is apparently dead, the team retreats.
Rally Points:
 Rally points are designated points the ambush team uses to regroup, re-organize and extract. Determining a good rally point depends largely on the terrain and combat conditions. It should afford the team good cover and concealment. However, this can not always be the case. You can use distance, landmarks (the best option), or other means to designate the Rally point. However, you designate this position, always make sure all team members can quickly and easily find the location. Remember your force will be breaking contact with the enemy. This can be a stressful moment. Even the simplest instructions can become confusing and complicated to operatives. So above all else, make certain everyone can find the Rally point.
CONCLUSION
Again, this is the basics. You will have to practice with your AirSoft team to fine-tune drills and learn capabilities. In any case, I am certain you will find the ambush to be a very useful tool to dispose of your adversary
